
Hello friends and family of ChristianGoth.com, so glad to share with you the first beauty article of many. You can follow me on Pinterest, where there is many videos and makeup ideas on my “Wake up Why Don’t You Put on a Little Makeup” board. So without much ado, here is goes….
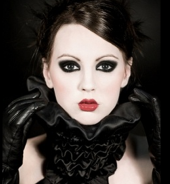
This picture is not mine, It belongs to an unknown person and was pulled from Pinterest.
What you will need:
· Concealer in your skin shade (Cover Girl Queen Collection for African American skin, Perscriptives, Cover Girl, Mary Kay)
· Either liquid foundation or mineral powder foundation, or both, in your skin shade (unless you want to do white) (Maybelline, Perscriptives and Cover Girl/Queen Collection for African American skin, all have great shades and products you can get at any drugstore or Target) (Go to Party City, Hot Topic, or bennye.com for white makeup)
· Loose translucent or your skin shade, powder
· Eye primer (or you can use concealer or foundation swept and blended across your eye lids) (Mary Kay has a great eye primer, so does L’Oreal and many other brands, it is concentrated and only takes a little)
· White or cream color eye shadow (L’Oreal, E.L.F, Maybelline all have great color pallets)
· Black mascara (lengthening or thickening is the best) (I suggest Mary Kay’s Ultimate Black Mascara $15.00, this is what I use and it does not come off easy, or Illegal Lengths Black Mascara by L’Oreal)
· Black and grey eye shadow (E.L.F. cosmetics at Target are cheap in price but wonderful product) (1.oo per eye shadow, 3.oo for magnetic quad eye shadow compact, or their pallets that range from 6.00-t0 1o.oo.)
· Black liquid or pencil eyeliner (E.L.F., or L’Oreal liquid eyeliner)
· Dark red or dark purple lipstick (Rimmel and L’Oreal, at Target or Wal-Mart has great colors)
· Dark red or dark purple lip liner (you can also use the lipstick as a lip liner with a lip brush) (Rimmel, again has great prices and products)
· Sponge applicator or foundation brush ( package of sponge wedges at any drugstore, Wal-Mart or Target,E.L.F. at Target has great makeup brushes, higher end brushes at Target by Sonya Kushek, or Mary Kay Foundation brush for 10.00)
· Mineral brush or round powder brush (Again E.L.F. brushes or Sonya Kushek at Target or Mary Kay)
· Lip brush (E.L.F. Brush, Sonya Kushek)
· Eye liner brush (if you use gel potted eyeliner, E.L.f. or Sonya Kushek at Target)
· Brow comb/ eye lash brush (E.l.F or Sonya Kushek) (Mary Kay also has a wonderful brush set for 55.oo, I’ve had mine for six years now and they are still awesome)
This is a wonderful smoky eye look for anyone, very dramatic and usually a night time look. But for Goth’s it’s all day makeup for us!
1. Make sure your makeup brushes and applicators are clean and sanitized (wash them the night before in an unscented antibacterial soap and then dip and swirl them in a mixture of white vinegar and a few drops of tea tree essential oil). The soap cleans the brushes, the white vinegar (buy at any grocery store) and tea tree oil (buy at a health foods store or organic store, spa near you) are antiseptic, antifungal and will not strip your brush bristles. You only need one or two drops of the tea tree oil. Too much and you can burn your skin! Always use a carrier oil (grape seed oil, olive oil) to cut a essential oils with, do not use essential oils directly on the skin! In this case you are using about a cup of vinegar to mix with the tea tree oil, so you will not need the carrier oil. NEVER use any cleaner with alcohol in it on your brushes, this will strip brushes and cause the hair to break and ruin your brush. Then let them air dry. At the least, wash and sanitize your brushes once a week. Dry them on a clean, fresh towel, laying flat on a surface. Fold one end of the towel over the bristle side of the brushes to keep dust and dirt particles from settling on them overnight.
2. Wash and moisturize your face. If you do not moisturize the foundation and mineral powder makeup will not go on as smooth and will sit in and show every line, wrinkle and crevice in your skin.
3. Make sure you have adequate and good lighting. The best lighting is outside, natural light. So find a great window to sit near to apply your makeup.
4. Pull your hair away from your face and secure it.
5. Start with the concealer. Put a small amount on the tip of your ring finger to apply, or your foundation brush. Apply on pimples, blemishes and under eye dark circles. When putting on under the eye, use little pressure and move from the outside corner of your eye to the inside corner of your eye and blend. Be sure to blend well or you will have white spots where you apply.
6. Next use a sponge makeup wedge, or your foundation brush, or mineral foundation powder brush to apply the foundation. Apply the foundation to your hairline and jaw line first. Blending up into the hair line, and down onto the jaw line and neck with even strokes, blend well. Repeat this step on the whole face, forehead, nose, bridge of nose, across the top of lip between upper lip and nose, cheeks, and chin. Make sure everything is blended well and looks natural. If you are using white makeup, your face and neck will look paler than your decollate (chest area) Hands and arms. So in this case use a white that has some color blended into it, or a paler makeup a shade lighter than your usual skin color.
7. Next take a loose powder and brush it under your eyes on your upper cheeks, and sides of nose. This will help catch any falling eye makeup and when you are done with your eyes you will be able to sweep the powder and fallen product away with a brush. Without the eye makeup sticking to your skin and messing you up.
8. Then apply your eye primer, concealer or foundation very thinly over your eyelids up to the brow. This helps eye makeup to stay on and to keep from creasing throughout the day and night.
9. Start with the white/cream color eye shadow. Apply it right under your brow on the brow bone. Don’t do this too heavy, and blend from the inside of brow bone to out side. This helps open your eyes open up keeps them from looking not so tired, especially since you’re using dark, dramatic makeup
10 Move on to the grey or black eye shadow. Use a sponge tip applicator, or an eye shadow crease brush to start a line of shadow from the outer corner of your eye out in a half v, back into the crease of the eyelid and take it down to the inside corner of your upper lid. Fill in the line with the same eye shadow all over the lid, like coloring inside the lines of a coloring book.
T Then make sure you blend it well so it is all one color on your lid, except for the brow highlighter. Next get your black eyeliner (pencil, liquid, or gel) depending on how thick or thin you want your line, and how dramatic you want your cat eye or wing to look on the end of your eye is your preference. Start with a thin line on the inside corner of your upper lid, close to the lash line and follow the natural curve of your eye out to the outer corner of your eye and make a sweeping motion up to give you a wing or cat eye look. Then take the same eyeliner and start from the outside corner of your bottom lash line, and move inward towards the inside corner of the bottom lash line. Again you can do as thick or thin as you would like. Remember the more eyeliner you put on your upper and lower lash line, the more closed up your eyes will look. If you want a smoky look, if you’re using a eyeliner pencil, after applying eyeliner, use the tip of sponge eye makeup applicator, or very end corner of a sponge makeup wedge to smudge eyeliner. There are also smudge brushes you can buy for this purpose. Some eyeliner pencils, like Rimmel, have these built onto the end of their pencils. Next apply your first coat of mascara. Start at the base of the top lid lash line, as close as you can get and wiggle the applicator back and forth then roll the applicator as you get towards the end of the eyelashes. Do this in the inner corner, middle of lashes and outer corner. Brush with mascara wand/brush to keep lashes separated. Then repeat with a second coat. More than three coats and you’ll have what I call “tarantula lashes” they will look thick, stuck together and clumped. Try to avoid this by brushing and separating lashes between coats. TIP: Never pump your mascara applicator in and out of the product. Twist it out and in. Pumping puts air and bacteria into the product and dries it up and can possible cause an eye infection because of bacteria contamination. Replace your mascara every 4 to 5 months. Never share your mascara with anyone. Now sweep that loose powder on your cheeks, and nose away. Make sure the powder is blended as well.
16 Now for the luscious lips. Dark colored lipstick feathers and bleeds, as we all know who’ve used it. To keep this from happening use a little concealer or liquid foundation with a sponge wedge or lip brush. Apply it all over the top and bottom lip line, blending into the surrounding skin. This will help lock the lip liner and lipstick and keep it from feathering and bleeding. Next line your lips with the lip liner of your choice (red or dark purple) with a lip brush and lipstick or lip liner pencil. Be sure to blend down into your lips.
TThen apply moderately, the lipstick of your choice. You can leave it at this or you can set it with a thin coat of loose translucent powder, this will give you a matte look. Or you can put a clear gloss over the top for a shiny look. Use a makeup setting spray if you have one, or just put another layer of translucent powder all over the face, avoiding eyes and lips to set your makeup. And Voila, you have a simple Goth look. You will get more efficient and quicker at the makeup application every time you do it. I know this seems like a lot of steps. But I go into detail so you know exactly what to do!
HAVE FUN and be blessed! I will praise you, Lord my God, with all my heart; I will glorify your name forever. Psalm 86:12 http://biblehub.com/psalms/86-13.htm
Makeup Tutorial
Written By: Angela Star Chambers
8/27/2013
All products mentioned and suggested are brands and have copy written logo’s. All stores mentioned and suggested are brands and copy written as well. All pictures provided are pulled from the internet, I have no rights to them.